In continuation of yesterday (be sure to read the comments!) I recut my sample to incorporate that pleat (below). You’ll also note that I rounded off that lower center front in order to make it look more similar to the samples I showed yesterday.

I’m of two minds when it comes to that pleat. Adding that pleat at the bottom is not a big deal with one exception: where is that extra length coming from? [If you have a copy of my book, the rest of this discussion will go much better if you open it to page 154] If the extra length needed in the lining piece has been added directly at the bottom of the jacket, forming the pleat is no problem. However, most suit makers add that length in the upper body of the garment, usually just below the armhole. As one of the commentors mentioned, you need extra lining length right there to aid in pulling the jacket off and on. Your arms move around a lot so that’s why we put extra lining length right there.
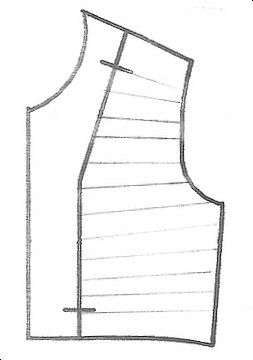
That extra lining length in that area is taken up as it is eased onto the front facing, typically between two notches on the facing. One notch is at the upper end of the facing and one is at the lower. If you have my book, see pages 154-157 (how to draft linings). If you look at figure 5.26 on pg 155, that horizontal line is where most pattern makers put it. Accordingly, you need to ease in that excess in that same approximate area. As an example, here is a picture of a front lining piece and the anticipated ease radiation when sewing the lining to the facing in between the upper and lower notches.
Now, if you’re not easing in that extra length in between those two notches because you’re saving it to form a pleat at the hem, you have a problem -in my opinion. The direction of the ease radiation is distinctly different as compared to it’s point of origination which you can see in the sketch below:

Considering the above, while you may not notice this effect in meltons or leathers, it will be obvious in lightweight wools and silks. Your lower center front is going to “hang up” and no matter how much you tug it forward and down, it’s not going to want to lay right. Therefore, if you want that pleat at the bottom, you cannot borrow the upper ease to do it. Rather, you have to add length at the bottom of the lining to form the pleat.
Now another thing to consider is that since the lining is already 1/2″ longer than the garment (once you allow for the hem upturn and seam allowances), adding additional length at the bottom means you’ll have to be diligent about tacking the lining to the shell side seam allowances in order to keep it from hanging out. I mean, once you have the garment on, the lining won’t be hanging out but it will on the hanger so people won’t want to buy it.
Okay, now that I’ve explained the qualifiers for that bottom pleat -and actually sewed a comparative sample for you, can we continue the discussion of how we know this is right even though we’ve never seen it before? Thanks.
Related:
Name this tutorial
Nameless tutorial #2
Nameless tutorial #3
Nameless tutorial #4
Nameless #5 (back vent)
Nameless #6 -Troubleshooting
Nameless Tutorial #7
Nameless Tutorial #8
Nameless Tutorial #9
wow, I’m so glad I retrieved your book from the friend I’d lent it to. I’m realizing how much info went over my head on the first 2 passes. Time to read it again.
On the “how do we know it’s right” issue…It seems to be an issue of applying Occam’s razor. Basically, if your way is the simplest, then it’s right. Of course, this assumes that a reductionist attitude applies equally well to fashion design as to scientific theorizing…
Hm, that must be why they also taught me to raise the underarm 1/2″ as well, to accommodate the lining falling out. I’m going to try your technique next time.
How do I know it is right? Because it looks good. Plus, it’s not as fussy as the other ones. Maybe there might be a better one but I haven’t seen it. Therefore I suppose it is “right”.
I think it’s the correct way because there is only one way to sew it and end up with this result. IOW, there’s no “whatever works best for you” with this method as there is with the workarounds.
“can we continue the discussion of how we know this is right even though we’ve never seen it before?”
I have no idea. If it works then how can anyone argue otherwise?
I would love to see a tutorial on doing the back vent on a bagged jacket.
Devil’s advocate:
An argument could be made for the additional slack at the bottom (in addition to Kathleen’s technique, and as she mandates, being religious about tacking the seam allowances so the lining doesn’t hang out when not worn) in order to provide slipperiness across the back – think of a jacket long enough to sit on (some are) or sliding across a car seat. Bending over to retrieve something dropped under the next row of seats in a theater.
It would still be less work than that stupid hand-tacking.
My next jacket, I’m going to do both and see how much fuss it is. That will give a sample to promote the combination of techniques to clients (who will only be told, “This is what I’ve found to be best” – whatever that turns out to be).
Intuitively, this is the right way because it looks “finished.” The other ways look half-done. But… to bring up a previous question about alterations: is there a reason that a technique that looks half-done would be so common? Are the ugly techniques a by-product of something like draping?
Kathleen’s way is clearly the right way if you are sure of your fit, shape and measurements when you draft your pattern. There is no advantage in doing it any other way.
But if some questions about fit are still unresolved when the jacket is being assembled, would the ugly nameless joins allow easier rejigging of the fit for a particular wearer?
A couple of things on the pleat – If the lining shrinks during dry-cleaning – which has happened to me – the pleat will prevent the lining from pulling up the back of the jacket. If the dry-cleaner has lousy pressers, the pleat will make the lining hang down below the jacket if the lining is not placed high enough from the bottom of the hem.
Kathleen talks about materials testing – different rates of shrinkage is one reason to be diligent about it. As for dry-cleaners – I drive about 10 miles to find a good one, and this is in metropolitan Detroit. But then, I’m obsessed.
Intuitively, this is the right way because it looks “finished.” The other ways look half-done. But…is there a reason that a technique that looks half-done would be so common?
When I read this comment, I realized that one of the reasons I brought up this topic is to illustrate that in the industry, we don’t have any “secrets”. I mean, how can this be a secret if we’re doing it wrong? Or, you could see this as a “secret” we don’t have (obviously).
This tutorial was my way of illustrating that there’s no cabal, there’s no central repository of knowledge that we can access to advantage. Iow, in the industry, the methods and processes we use are cobbled together via reverse engineering or embodied in the tacit knowledge of individual employees we hire.
It was also to illustrate that as much as we know, and after 200+ years of commercial apparel production, there is still room for improvement. I think most designers out there think we have “all the answers” and they just need to figure out how we’re doing things. But the truth is, the industry still needs to evolve in methods and processes. Otherwise, how can you explain the fact that one lowly pattern maker can figure out how to do this fix when 95% (guestimating) of the world’s producers of suits are doing crappy workarounds? The answer is, how can we have “secrets” when we really don’t know how to do it ourselves? Our industry really needs greater stringency in methods and processes. Process methods are not as “soft” as even manufacturers think. Even in the big, bad garment industry, many of our methods and processes need to be redesigned which will allow for lower costs and increased quality and productivity.
Besides, I just love cooking up improvements like these. It’s what I do best. I’m sure I’ll put up more of things like this over time -depending on visitor reactions; if I’m lambasted I’ll just shut up and keep things to myself. It’s why I’m uncomfortable with “whatever works best for you” because I think things can be better quantified and controlled than the capriciousness and precariousness that that statement implies. Results can and should be reproducible and predictable.
Kathleen,
As I’m sure you know, most of the handmade suits are also using those work arounds. I have looked at a lot of suits and I have NEVER seen your method used, including on the 1968 British hand-made I have in my studio.
I’m impressed with your method’s simplicity and the clean-ness of the final look.
Thomas
Okay–i have a number of stupid questions–which way is the facing seam allowance pressed? Which way is the seam allowance where the hem meets the facing pressed–butterflied? I can’t see the pleat–so help me–where is it?
Please answer these questions-then maybe i’ll have more to say.
The seam allowance is pressed towards the lining; the entire seam is. That doesn’t change. The pleat is right there, it’s a fold. So clean you can’t see it maybe. Compare to the photo in #7.
I looked at my coats and jackets last night–i have one with a Nordstrom label that has the same construction that Kathleen suggests–(boy can i feel smug?)–it’s my favorite jacket because it’s cut so well. However it’s made of light weight worsted wool–which means the seam juncture is quite flat. Two other jackets in heavier tweedier wools had the construction like #7 or #8 of the part 7 of this tutorial. I’m convince that this is better construction for these jackets because of the bulk that would be created with Kathleen’s construction. With #7 or #8 you have three layers of fabric where the lining meets the facing. If the facing is seamed with the lining then you have an extra layer–and where the seam juncture you have two layers plus lining above and below four layers plus lining–in a heavier fabric that’s a big difference. A good place for a lot of wear on the lining–since it makes a big bump. What’s good about the all hand sewn in linings, (although i’m not suggesting anyone do them) shown earlier also is that the lining can be lifted completely out to be replaced–without disturbing the outer fabric seams of the coat/jacket.
You know–i love fast, simple solutions to stuff but fabric makes a big difference in what kind of construction works. FME Kathleen’s would work best with lighter weight fabrics–i’ve got a RTW jacket to prove that–but would be clunky with heavier and loosely wovens.
deerskin, I think you’ve nailed it…So in one case “quality” is defined as alterability, and in the other, longevity. The end result may not look as nice, or sew up as easily, but it serves the relevant definition of quality well.
Another interesting thing to examine is japanese kimono. Besides the fact that they are generally entirely hand sewn, the construction methods & sewing order are really unfamiliar to western eyes… It’s interesting to see where time-saving methods* are used, and where labor-intensive methods are used.
Everything makes perfect sense when you realize these things are almost never washed, so parts that get dirty quickly must be really easy to remove and replace. And when they are washed, the traditional method was to take the whole thing apart, sew it back into flat yardage, wash the yardage, and re-sew the whole thing. So nothing is ever cut away, all the fabric is in there, creating bulk and a really lovely weight. And shortcuts are used whenever possible. Oh yeah, and the stitch “quality” sucks. Under stress, they’d rather the seams pop than the (outrageously expensive) fabric tear.
*one common technique is to sew both shell layers and both lining layers at once, all four layers in one seam. The entire seam ends up trapped between the shell and lining on one side of the seam.
I have since seen this a couple of times in my thrift-store research missions.
Jinjer, i hope i did not imply that alterability and longivity are some how opposites.
If you got that then please know that is not what i was interested in conveying. And quite honestly i really prefer that people not put words in my mouth–i have enough there already thank you.
I would say that alterability adds longivity in some people eyes. And a quick, simple construction does not necessarily mean that a garment will last a long time.
Regarding kimonos i doubt that the lining and outer fabric are sewn together because it’s time saving–it could be that they were using the lining like underlining–we call it flat lining in the costume world–to give body to the outer fabric and, especially if it’s delicate, to put a buffer between the outer fabric and the stitches..
I do agree with you that the bulk in kimonos is aesthetically pleasing.
Oh while i was shopping today–i hate to shop really–at the mall i checked out more light weight jackets and some had Kathleen’s construction method–Hundredth Monkey? Bandolino Woman was one brand–i don’t remember the other.
Traditional kimono (sing. and plur.) were never lined (nor did Jinjer say they were). Rather, they were stacked – geishas and brides sometimes had seven layers, each adjusted to peek out from the one on top. There was additionally an underkimono (help, Jinjer – I researched this all when making a full geisha one for one of the Galas and lost it in a hard drive crash) which absorbed body oils, etc. and was more easily laundered.
Kimono were an essential part of the wardrobe of even the poorest woman. She might have one for her wedding that was taken apart for cleaning (as noted), have the dye discharged, and be redyed appropriately several times over the course of her life. Both men and women wrapped the same direction. Burial kimono were white, and wrapped the opposite way.
In an attempt to get this back to topic, their “jackets” were short kimono-style coats called happi (which means coat). All traditional Japanese clothing was originally constructed from the long, narrow pieces that could be made on a backstrap loom – like most “folkwear”.
If you manufacture from Hmong hemp, you’ll find it comes in strips about 18″ wide, because they still make it that way.
Jinjer, i hope i did not imply that alterability and longivity are some how opposites.
nope, you didn’t. I was just saying that if things like “aesthetically pleasing interior”, “alterability” and “longevity” happen to be in any amount of conflict in a particular garment, then in order to determine “quality,” you have to prioritize them appropriately. You did a nice job of explaining which qualities were prioritized in which jacket, and why. Thanks!
…i doubt that the lining and outer fabric are sewn together because it’s time saving–it could be that they were using the lining like underlining–we call it flat lining in the costume world–to give body to the outer fabric and, especially if it’s delicate, to put a buffer between the outer fabric and the stitches..
Of course, I can’t be sure of the reason for sewing certain seams in this way, but speed is definitely important–a kimono sewer has to whip out a lined kimono in a day. by hand.
Traditional kimono (sing. and plur.) were never lined (nor did Jinjer say they were). Rather, they were stacked – geishas and brides sometimes had seven layers, each adjusted to peek out from the one on top. There was additionally an underkimono (help, Jinjer – I researched this all when making a full geisha one for one of the Galas and lost it in a hard drive crash) which absorbed body oils, etc. and was more easily laundered.
Carol, they were both lined AND stacked. And the 7-layered kimono (juunihitoe) were not worn by Geisha (a relatively modern invention), but by Heian-era court ladies, around 1100 to 1400 a.d., I think. And it wasn’t 7 layers of Kimono (the way we use the word kimono today), one of the layers was a pair of pants (hakama), one an apron, one a train, and one a vest. there were usually 3-5 kimono. Geisha and Maiko do tend to wear two or three (lined) kimono stacked atop eachother, though.
The kimono Heian-era court ladies wore were what is now called Oosode: the sleeves were NOT sewn up at the wrists, so you could see the lovely color play of the layers (and their linings) very easily at both the neck and the HUGE sleeve openings. That color play was the whole point of the layers (although a a convenient side-effect was that it trapped those pesky women in their houses, ’cause those suckers were HEAVY and worn very long-they didn’t start tying them up at the waist until a little later).
What we call Kimono today, are kosode, which is what they wore for underwear. The sleeves are mostly sewn up in the front, leaving a small opening for the wrist. The modern kimono underwear consists of two layers. The bottom is a sort of cotton chemise or wrapped camisole & skirt set, and the second layer is a knee-length kimono very similar to the outer garment (also lined), called a shitagi. There are all sorts of great accoutrements that go in between this underwear and the final kimono to flatten and smooth your silhouette; I have quite the collection. Not to mention all the stuff that goes around the middle on the outside–obi, obi-age, obi-jime, etc. etc. mmmm, yummmy. Wish my collection were larger, but except for the obi, these things are nearly impossible to find used, and are very expensive new. ( I paid as much for the tie that goes across the middle of the Obi as I did for 2 or 3 gently used kimono)
Happi jackets are for summer or lower class people. Haori are more prevalent, and are all-season; there is also a really cute housewife jacket that I can’t remember the name of that is a more recent invention. And probably others I don’t know about.
There is an exception to the fact that all kimono are lined: summer kimono (yukata) are unlined, and often quite sheer. You don’t even have to wear underwear under a yukata, either. (scandalous!)
sorry, you’ve stumbled into a subject that’s near and dear to my heart.
oops! I just went and looked at my shitagi (the modern underwear) and some of those are unlined.
Oh, and Juunihitoe means 12 layers, not 7. I’m sure there are plenty of other little errors like this in my essay up there.
Getting back to jackets, and construction methods and aesthetics–i like the look of hand stitching–so the hand stitched garments shown earlier don’t look ugly to me–nor uglier than Kathleen’s solution for seams that don’t run flush.
I guess that’s what i was trying to say earlier–that aesthetics aren’t universal. I may be in the minority here though by liking the hand look.
Kathleen, I’d love to pursue the kimono thread. Would you move it to the forum so we can concentrate on the original topic here, please?
A rather late comment, but I just happened to look at the lining of the jacket I’m wearing today, and was reminded of this thread. It’s a quite heavy woven fabric (made with thick threads, yarn-like, with the yarns creating “fringes” at the edges – very popular style now). Anyway, it’s from a mainstream women’s “better sportwear” manufacturer (Jones New York Signature), and it’s finished in Kathleen’s preferred method. It does have a bottom pleat, but the lining should never pull so low as to hang out, because there’s about an inch and a half below the seam. Additionally, for extra ease, there’s a mid-back pleat in the lining that starts just below the label, or about two inches below the collar seam.
The lining and style work quite well with this bulkier fabric. The facing fabric does make the “cuff” region of the sleeves a little stiff, and I can definitely tell where the 4-layer seam is on the underside of the wrist, but it’s not really problematic. Now, I think original retail price on this was around $200 (I just bought it at 75% off!), so this isn’t necessarily inexpensive, but it’s hardly expensive, either.
Kathleen,
This tutorial is THE BEST thing I have ever seen in any sewing-related book, video, or tutorial. I have been plagued by jackets that “curl under” at the front/facing area, and I have never known why they did it. It seemed that I was doing something wrong- and then I saw Bill Clinton wearing a jacket with the very same problem. That made me feel a little bit better- but not much… Now I understand the reason for the “curling” and how to correct it. I have been wondering about that for ten years now. Also, I love the way it looks- very professional and secure… I realize that these tutorials were done a few years ago- but are you still doing them? I would be willing to pay you for a really good way to do that “Four Point Closure” thing on a notched-collar jacket. One where the points actually meet and the pieces fit. Is that hole really necessary at the juncture? I have a fast and easy way of doing it, but the hole is not there in this method…