If needed, catch up by reading part one of Jinjer’s invisible zipper sewing tutorial.
—————————————-
Continuing with yesterday when you started with your beautiful invisible zipper that just needs a facing and pressing. For the pressing, I created a pressing jig (I’m so proud!). I pressed the zipper before I inserted the facing, but I later figured out a way to press at the very end. More on that later.
For now, below you’ll see my pressing jig below. Notice that the folded edges in don’t quite come together in the middle. That is not to accommodate the zipper coils, which will lie under the pressing jig while it’s being used. It’s to accommodate the turn-of-cloth, or “bend allowance,” as Kathleen calls it.

Below you’ll see what it looks like unfolded. I forgot to mention that I chose a 7/8″ invisible zipper. I should have told you that yesterday, because the 3/8″ seam allowance in the zipper region assumes a 7/8″ zipper… I think. Anyway, the measurements of the pressing jig are:
middle section=1″ plus a hair (that extra 1/8+” is for turn-of cloth allowance so you can get the get the zipper in.)
first fold width, on either side= 3/8″ plus ~1/16″ (almost, but not quite 1/2 of the middle section)
second fold width, on either side= at least half the width of the iron you’re using.

Below you’ll see that the pressing jig fitted onto the zipper. Basically, the zipper goes in the slot.

You must stretch the fabric away from center as you press. The weight of the iron will press the jig closed. In case you haven’t figured out yet, the jig prevents any impressions of the bulk zipper and seam allowances from showing through on the fabric, and prevents the fabric from getting distorted as you press. Just try pressing without it and see how crappy it looks.

Below you’ll see how nice that looks. I challenge you to find the end of the zipper…

Now for sewing the facing. This is essentially the same as in Kathleen’s centered zipper tutorial. As you see below, line up the facing and fabric, right sides together and sew down the edge, using the zipper foot to decide a comfortable seam allowance (which turns out to be ~1/4″)

Repeat this on both sides (below)

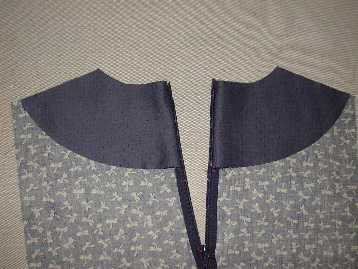
If, like me, you are spatially challenged and stubborn, you can check to make sure everything will line up correctly at this point. Below is a picture showing that the “neck” edges will line up correctly. You may also want to close the zipper to check that the tops of the zipper will line up, too. I always forget this, so I’m always a little off. I guess my accuracy isn’t perfect yet :(.
Kathleen’s centered zipper tutorial discusses this more in depth but when you’re sewing the next step, you’ll fold the shell (outside) fabric over the zipper teeth, with the fabrics right sides together, so that the top view looks like the photo below:

Once you’ve folded everything correctly, simply sew the “neck” seam with 1/4″ seam allowance.

Okay, remember that pressing jig? Well, I later decide that you can make a pressing jig that works at this point, with the added bonus that it helps get the corners flat and square (I smashed them with my clapper in addition to pressing them-this may be a good place for a judicious application of a sewing hammer). If you do, here’s the style of pressing jig you’ll use. Note the cut out portion so you can slip it under the facing in back…that cut out portion is the same length as the facing pattern…just shove the corners of the jig flaps under the facings, all the way up to the edges. And press as before. And smash those corners.

Note that the pressing jig shown here is my invention. I don’t know whether sewing contractors use something similar but it’ll work for your samples if you -like me- ignore Kathleen’s excellent advice to hire a professional and end up making your own samples. I do suspect that large contractors have neat-o pressing equipment that obviates the need for such a jig. I mean, check out this piece of equipment below (for only $899!) that has a heated surface and claims to eliminate impressions.

Anyway, below you’ll see how it looks when it’s done from the outside

and below, from the inside

If you have any questions or comments, feel free to post them here or email me.
Related:
Process review: lapped zipper
Lapped zipper template
Lapped zipper construction
Lapped zipper specs
Centered zipper template
Centered zipper construction
Invisible zipper tutorial pt.1
Invisible zipper tutorial pt.2
Shorten a separating zipper
Zippered welt pocket tutorial
Deconstructing a zippered pouch
Zippered welt pockets
Nice tutorial, Jinjer!
The usual solution to avoid embedded seam allowances is pieces of cardboard that slip under each edge/facing. The silly things don’t stay in place when you flip the garment right side up (unless you have prehensile toes to add to the equation), so combining the parts is an elegant solution.
Key the closed top of the zip with a chalk line (washable marker?) before you start inserting. When everything’s sewn, the lines on each tape should match perfectly. The couture version is a hand-basted thread that runs across and is then clipped, ooh la la.
Yes, nice tutorial, Jinjer! Thank you.
this is the most useful tutorial, lost my notes that i needed about 3 hours before my shorts for uni were due. so helpful and easy to follow I can’t thank you enough! :)